
You need:
an ugly binder
fabric for outside cover
fabric for inside cover
inexpensive muslin fabric for pattern/lining
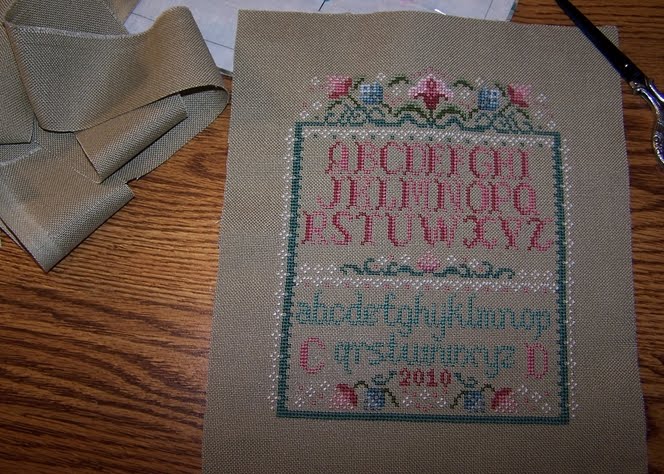
embroidery piece to use for insert
thin vinyl to cover embroidery (if desired)
1 package extra wide double fold bias tape (3 yds.)
fabric marking pen (or pencil or Sharpie, if you have to)
tracing paper & wheel
masking tape
Make a pattern from the binder by placing it flat on the muslin and tracing the outline directly onto the muslin. Mark 1/2" beyond the traced line on all sides. This is the cutline. Make two of these. One is for the outside cover, the other for the inside cover. On the one for the inside cover, mark the spine folds - top and bottom - and then use a straight edge to draw lines to connect these marks.
If your binder is like mine and the rings are mounted to the righthand cover, you will need to cut one more pattern for the spine. Mark at the top and bottom where the spine folds and use a straight edge to connect these marks. Add 1" on each side and 1/2" top and bottom for the cutline.

If you are going to add a piece of needlework to the front cover, now is the time to figure out where it goes. This tutorial shows the emboirdery centered on the front cover. Measure the height and width of the portion of the needlework that you want to show - don't forget to allow for a border (I used 1/4") - for example, 6 1/2" wide and 8" high. The front cover of this binder is 10 3/4" wide and 11 5/8" high. To center the piece horizontally, calculate the left and right margins for the front cover as coverWidth - needleworkWidth / 2, or
10 3/4 - 6 1/2 = 4 1/4 / 2 = 2 1/8" left & right margins
Calculate the top and bottom margins using the same formula.
11 5/8 - 8 = 3 5/8 / 2 = 1 13/16" top & bottom margins

Using the left/right and top/bottom margins, mark the rectangle for the needlework on the front cover muslin pattern only. Carefully cut away the rectangle. Save the piece you cut out. It will be used as a pattern for cutting the vinyl.

Pin the front cover muslin pattern to the front cover fabric being careful to keep the rectangular hole rectangular. If your fabric has a pattern, play with the placement of the hole until you are pleased with how it will frame your needlework.

Cut the front cover fabric. Do not cut out the rectangular hole in the cover fabric.

Using the cut-away rectangle pattern, position it on the vinyl so that there is at least 1" of bare vinyl beyond each edge. Tape the pattern to the vinyl, if necessary, but don't use pins since the holes they leave will be permanent. Cut the vinyl and set it aside.

Pin the second muslin pattern to the inside cover fabric and cut along the cutline. If your binder has the rings on the spine, cut up the middle of the spine section to give you the left and right inside covers plus seam allowance. (Note: if this is a narrow binder, go ahead and cut up the middle to divide the left and right halves, but know that your inside cover won't come all the way to the spine fold. If this bothers you, make separate patterns for the left and right inside covers.) If you made a third pattern for the spine, cut it now, too.


Using tracing paper and a tracing wheel mark the location of the spine folds on the wrong side of the left and right inside cover fabric and your spine piece, if you have one.

If you don't want an inside pocket, skip this part. I used a scrap of the outside cover fabric for the pocket. Cut the fabric so that the top edge is straight and it is as wide as the left inside cover plus its seam allowance.

If you are using a pre-quilted material, mark the spine fold edge and pick out the quilting to the right of the seam allowance. Cut away the batting and the bottom fabric to keep the folded seam from being too bulky.

Sew bias tape to the top edge of the extra pocket. Remember to sew on the short edge of the bias tape.

If possible, position your needle to the left when stitching this edge.

OK, pocketless people, welcome back. Now it's time to trim the embroidery down to size. If your work is on a woven fabric like aida, a tea towel or canvas, use a measuring tape or ruler to mark 1" beyond the visible edge of the embroidery (what you'll see in the window) and cut out along those marks. If the needlework is on an even weave fabric like linen or Lugana here's the easy way to cut even edges: Take your tape measure and find the spot 1" beyond the visible edge of the embroidery.

Take sharp scissors and lift a vertical thread if you're marking the right or left side, or a horizontal thread if you're marking the top or bottom side. Snip that thread.

Use a needle to unweave that thread until there is enough for you to grab it.

Pull it all the way out of the fabric.

Do the same with the other half of the cut thread.

Repeat on all four sides.

Now you have straight lines to cut; just cut where the thread used to be.

All the pieces have been cut out and we're ready to start sewing in earnest.

One nice thing about using muslin for the pattern is that you can also use it for a lining by just moving it from the right side of the fabric to the wrong side. The fabric I used for the inside cover was somewhat lightweight so the muslin gave it some extra body and made it more opaque. If that's the case with your inside fabric, you can do the same thing prior to sewing the seams.
If you made a pocket piece pin it to the front of the left inside cover and treat it as part of that piece when folding edges.

On the left and right inside cover pieces and the spine piece, if you have one, fold on the marked spine fold lines with wrong sides together.

Fold again so the raw edge is now at the spine fold.

Iron the seams so you'll have nice sharp edges on your seams.

Sew close to the edge but be sure you catch all three layers.

Put these pieces aside.
Take a straight edge and mark the diagonal from each corner of the rectangular needlework window on the front cover.

If you have a rotary blade, you can go ahead and cut the diagonal; otherwise, take your scissors and cut on the marked line. Either way, be very careful not to cut past the corners.

Unless you are very sure with a rotary cutter, it may be best to stop a little bit away from the corner and complete the cut with scissors.
Remove the muslin pattern from the front cover. Turn the front cover over, face down. Take each of the 4 triangular flaps and fold them over to the back, making a straight line at the base.

Pin in place.

Position the vinyl so that it covers the window and tape it in place. Guess-timate where the needlework should go and tape it in place. Now comes the fiddly part of adjusting the position of the needlework so it looks good in the window. Flip the cover to the front, check it out and make adjustments on the back. When you have it to your liking, tape the needlework down, all the way around to hold it securely in place.

From the front, sew around all four sides of the window, close to its edge.

You'll be sewing down the triangle flaps, the vinyl and the needlework. Take your time and try to keep the seams even on each edge.
Remove the tape from the needlework and the vinyl.

Remove the pins from the flaps. Trim the needlework, vinyl and flaps to about 1/2" from the window seam.


Turn the outside cover face down. Pin the left inside cover in place over the back side of the needlework with the finished edge to the right. (Don't pin through the window area or you'll ruin the needlework and the vinyl.)

Pin the right inside cover in place with the finished seam to the left.

If you've got a spine cover, pin it in place, too.
Flip the cover over to the front. Use the double fold bias tape to enclose all the raw edges.

Make sure the short side of the bias tape is on top. (If you look at the bias tape the edges aren't the same, one side is a bit shorter than the other; that's the side you sew on.) Place your pins so that you will be sewing the bias tape clockwise.

This will keep the bulk of the cover to the outside of the sewing machine while you are sewing. (I didn't do that way and regretted every moment because it was all bunched up to the right of the needle.) The picture has been flipped to show pinning in the correct direction.
Once all the bias tape has been pinned down, commence to sewing all the way around. Remove your pins, snip your loose threads and slide your new cover on to that formerly ugly binder and you're done!

Enjoy your fabulous new, covered binder!

I wrote this tutorial back in January 2010 and posted it over on Craftster. I'm posting it over here to reach more folks and hope this is helpful to someone.


