Saturday, July 17, 2010

Cute Little Stinker

There are several feral kitties that depend on me for food and water. Two main ones and some that come by occassionally. Therefore, there is usually kitten chow and water on my front porch. One of the drawbacks to this is that I end up feeding animals I did not intend to feed. Like possums. And skunks. Currently, a family of skunks.


A couple of weeks ago, there was a commontion (with lots of squeaking) on the front porch. I went to the door to see what was going on. There was mama skunk and two young skunks. The youngsters seemed to be bickering over the kitten chow.

If you turn on the porch light and open the door, the skunks (and possums) usually leave quickly with no problem. This night, however, mama and skunklet #1 left right away. Number 2 had a different idea and came over to me. Stopping about 18 inches away, just staring up at me. The cheeky little thing finallly left after a few Shoo!s and a couple of you-need-to-leave-nows.

I think tonight's visitor to the cat bowls was that little stinker. S/he showed very little fear when I came out on the porch and snapped a picture or two. It may become necessary to hire someone to relocate this brazen little fella since s/he is learning not to be afraid of humans.

And because s/he can wipe out two bowls of kitten chow in one sitting!

Friday, July 16, 2010

July's TUSAL and other things


I'm less than a week late for posting the July TUSAL. Not bad for me. There's some new stuff in the bottle from recent projects, some more ort producing than others. Sure glad I'm using a bigger bottle. All of this wouldn't have fit so well into the small bottle I used last year.


For last year's July TUSAL, I took a picture of my orts bottle with a pair of scissors wearing this beautiful fob my friend SU had made for me. The frock is so complete there's even a petticoat under it!

At a recent stitching gathering I chanced to be sitting next to SU and I had the fob with me. S was very good natured about me wanting to get a picture of her with her creation. Thank you again, S! Love you, mean it!


I've been working on a lot a Susan Greening Davis projects lately. This one I really like and enjoyed making it. So many pretty stitches and beautiful beads!


This Purple Tuffet by Susan is my latest project. It took less than a day to complete. I so adore fast projects and the gratification that goes with them.


And speaking of biscornus, this one was a recent Make-It-And-Take-It project at the LNS. FC, one of the stitchers that attended, said she never does the projects and passed it on to me. It was a fun little project to stitch and originally was charted for only the little ABC pattern. The back is a freebie pattern I had printed from online some time in the past...from I don't remember where. If it's your's please leave me a message and I'll give you credit and link back to it. The pattern, with the addition of a few beads, was perfect for the tuffet. As a surprise, I gave the finished project back to FC. She was delighted and immediately started using it as a pin cushion. I love making useful things.


Lately, Pookie and I have been going to the local Farmers' Market to get yummy fresh vegetables. I don't have my late daddy's green thumb so I have to satisfy my yearning for home grown tomatoes at the Farmer's Market. It's a great little outing for a summer day and well worth the drive.


That squash was as delicious as it looks.


And, speaking of nature, here's a lovely web that I found the other morning as I was leaving for the office.

That's all for now. Happy stitching, y'all.

Friday, July 9, 2010

Tutorial: Lined box with compartment

Please add a comment and let me know how you came to be at this tutorial and if it was helpful for you.  Thanks!

I've recently been working on a kit from a favorite designer. I really liked the banding for the project, but the final finishing didn't make my heart sing. So, I poked around in the craft room and found what (with a bit of craftiness) will be a great alternative for finishing.


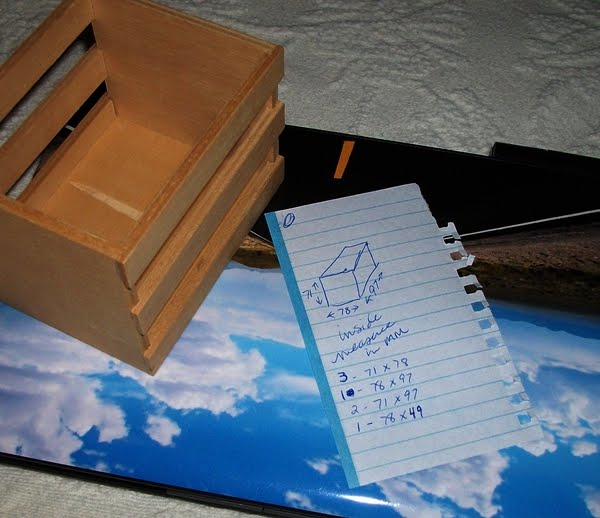
This little wooden crate is 3"h x 4.25"w X 3.5"d. Just a plain-jane little wooden crate. The banding was a near perfect fit, so it was time for some crafty goodness to dress it up a bit.

What you need:
wooden box
book board
rotary cutter/cutting mat/cutting guide or scissors
spray adhesive
quick dry tacky glue
felt
Sharpie or paint to match/contrast with felt
small scrap of fabric for pin cushion
sand or weights for pin cushion (optional)
poly fiber-fill


First, measure the inside dimensions of the crate. I measured in millimeters since it would be more precise. Measure the height, width and depth of the interior of the box. You will need one (1) piece for the bottom (width x depth), two (2) pieces for the sides (width X height) and three (3) pieces for the ends and center divider (depth x height).


Transfer your measurements to a piece of book board or heavy cardboard.


I used a rotary cutter and cutting mat and cutting guide to cut the pieces. It takes several passes with the rotary cutter to cut through the book board, but it make a very nice clean cut and it's worth the effort.


Test fit the pieces in your box. Put the bottom piece in first and then the two long sides. Make sure they are level with the top of the wooden box.


You will need to adjust the width of the three end pieces because of the width of the book board itself. Place the pieces on top of the box with the bottom and side pieces in place. Mark where the edges need to be trimmed and do so.


Test fit all the pieces now. The two end pieces and the middle piece should all fit within the two side pieces. If they are a little loose, that's good since the felt will make the side pieces a little thicker.


Take your Sharpie or paint and color the exposed edges of your pieces. This is just a matter of aesthetics and purely your choice. Do whatever makes your heart happy.


Now it's time to use the spray adhesive. I love this stuff but it can be evil if it ends up somewhere it shouldn't be. I like to put the pieces to be sprayed into a box to keep the spray from going everywhere. You can do this or take it outside (on a day with no or very little wind) or cover an area with paper or a drop cloth. Spray the adhesive on one side of the following five pieces: the bottom, the two side pieces and one of the end pieces and one side of the center piece.


Position the piece sticky side down on the felt. Press it in place so you get a good bond.


Neatly cut out each piece using the book board as the cutting guide.


If you used a little crate, you may want to make filler slats to give the box more solid sides.


Use the quick tack glue between the wooden slats and position the filler slats on top of the glue. Be sure the edges are flush with the box.


Put a bead of quick tack glue along the side and bottom edges of the book board center piece. Where you position it will determine the size of the compartment and the pin cushion.


Be very sure that the felt side faces the compartment side and the blank side faces the pin cushion side. The glue may get a bit messy when you position the piece. It will dry clear but you may dab at it with a damp cloth to clean it up a bit, if necessary.


If you want to give your box a bit of weight and make it more stable now is the time to put something in the bottom of the pin cushion compartment. I used about 1/3 cup of fine sand wrapped up in aluminium foil to add weight to my box.


I folded the foil into a packet and scrunched the ends up until it fits the compartment.


Push the packet around until it fills the bottom of the compartment. This isn't rocket science and doesn't need to be perfect; close is good enough.


Cut a piece of fabric for the top of the pin cushion. Make it at least twice as big as the pin cushion compartment. You'll need about half an inch on each side for gluing down and a bit in the middle to allow for poofiness. Put a line of glue on the inside far edge of the pin cushion compartment.


Press the right side of the long edge of the fabric onto the glue.


Put a line of glue on the near edge (the uncovered side of the center divider).


Use your fingers (or a pencil or other tool) to press the right side of the fabric into the glue. Using your fingers will help you leave a bit of room for the pin cushion to poof out.


Put glue on one of the short ends.


Poke your finger in the pin cushion tube (or a pencil or other tool) to press the right side of the fabric into the glue. Make any necessary adjustments to make it look nice.


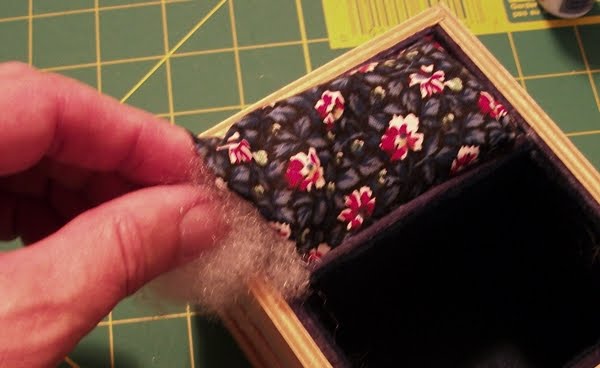
Stuff small tufts of poly fiberfill into the open end of the pin cushion. Small tufts will keep the cushion from becoming lumpy. Be sure to poke it down into the corners. Fill it nice and full.


Filled and ready to close.


Use your fingers to push the fabric and stuffing away from the unglued edge and apply a line of glue.


Push the fabric into the glue, easing the fabric into place to make it look nice.


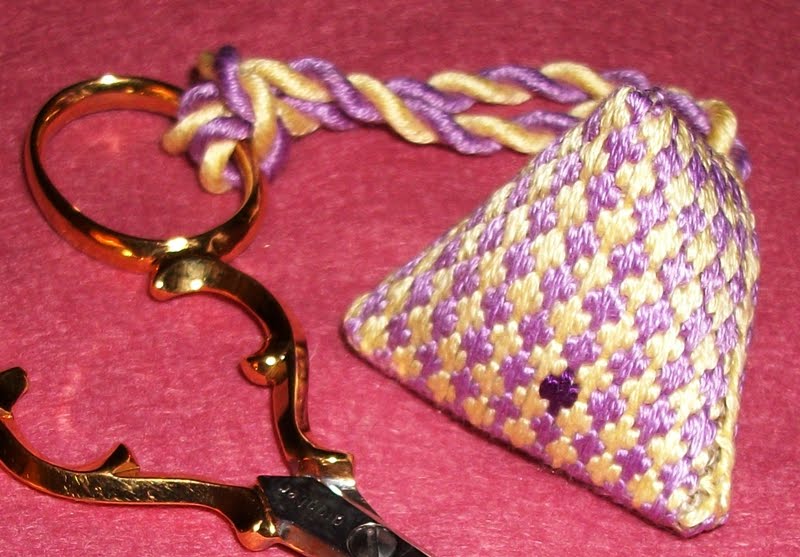
You're done! Now you've got a great little piece to keep your pins and needles under control while also having a place for your tools and what-nots.


Cover the box in whatever manner makes you happy. When I've finished stitching the banding, it's going around this box and I know I'll be delighted.

Have fun with this. I'd love to hear (and see results) from anyone that gives this tutorial a try.

June's TUSAL and other random stuff


It's almost time to post the July TUSAL but I'm just getting round to posting the one for June. Such is life these days. I did take the picture around the correct time which should count for something. There are bits and pieces from all sort of stitching, both original projects and those I purchased, and scraps from finishing.


Lately, I've been stitching on Susan Greening Davis projects that I've gotten either at classes or at trunk shows. I really love her designs and I'm very grateful to her for all the wonderful stitching knowledge she's passed on.


Susan aways says to follow your heart and do what makes you happy..even if it is changing a design. This was one of the class pieces from the Souther Stitching class in St. Augustine last January. The original design had waves along the right and left edge, but I prefered to put fishes. The design came from the book A Rainbow of Stitches.


One stitch I came across while looking though stitching books (something I love to do) is the Hugarian stitch. I believe it is normally a needlepoint stitch but it works well with floss and linen, too. This little scissor fob was made with a scrap of linen and a lot of Hungarian stitches. A bit of cording and there it is.


I used a double running stitch and a surface stitch to create the little humbug. They are rather easy to make, actually, since it's just a matter of joining the top seam at a right angle to the bottom.


While I was in the mood to make scissor fobs, I braided this little guy using up some left over floss. As it turns out, I didn't have enough of the orange to make the cording and had to improvise with black. Meh, it is what it is.


A recent doodle using different stitches resulted in this little needle book. Notice the background is, again, the Hungarian stitch. I really like that stitch, it adds great texture.


Stitch Witchery was used to line the inside with fabric and a bit of wool felt created the needle park area.


Another recent stitching doodle became a little pin cushion...


...mounted on a small stuffed pillow.


The needle book and the pin cushion were given to stitching buddy LS as birthday gifts. She was delighted with them. Happy birthday, L!


The last bit of stitching was started on my way to Talladega back in April. It is a Ginnie Thompson Guild design that's Assissi work. I'm going to finish it into a pouch for my digital camera.


And, for the cat lovers out there, here are a couple of recent pictures of Bob.


He's actually bathing, but it looks like he's laughing into his paw.

Ok. That gets me up to day on posting. Y'all have fun.