Showing posts with label needlebooks. Show all posts

Friday, August 6, 2010

Skunk Drama and Other Stuff

For the past couple of nights, I'd been taking in the cat food bowls in hopes of getting Mama Skunk to go for the grape jelly in the trap.

Yesterday, the guy that mows the lawn managed to get grass clippings in the cat food bowls on the porch. Without thinking, I tossed the cat food out onto the lawn. Then, I refilled the bowls for the feral kitties.

After dark, I happened to look out and saw Mama Skunk eating the cat food off the lawn. I called Sunny and asked if I should move the trap from the porch (close to where the food bowls usually are but aren't since I took them in) down to the lawn where Mama Skunk was eating the discarded food. He said that sounded like a good idea. Mama Skunk ran away when I went outside to move the trap. I added a bit more food on the ground below the trap and waited.

It wasn't long until Mama Skunk came back and happily munched all around the trap -- but didn't go in. *sigh* I added a bit more food around the opening of the trap, covered it with black plastic, went to bed and hoped for the best.


I got up at 5:45am to check the trap and, if necessary, move it up to the porch to get it out of the direct sun. To my delight, the trap had been sprung! Yeah! Got a skunk! I called Sunny to come get Mama Skunk and carried the trap, still covered with plastic, up to the porch.


Sunny came on over. Imagine my surprise when he said, "You know there's two skunks in there?" Yes, we had Mama Skunk and skunklet #5. Holy moly! I had no idea there were so many! He said that five was an average sized litter and that this may be all of them. He didn't leave a trap this time, but said that if more show up, just give him a call.


On the assumption that this is all the skunks, the final score is Sunny 6, Skunks 1. Go Team Sunny & Trapper Jack!

There've been a lot of skunk drama lately, but I've been crafty, too.

A couple of weeks ago some of my stitching buddies got together for some noms, stitching and playing Stitchopoly (basicly Monopoly for stitcher).


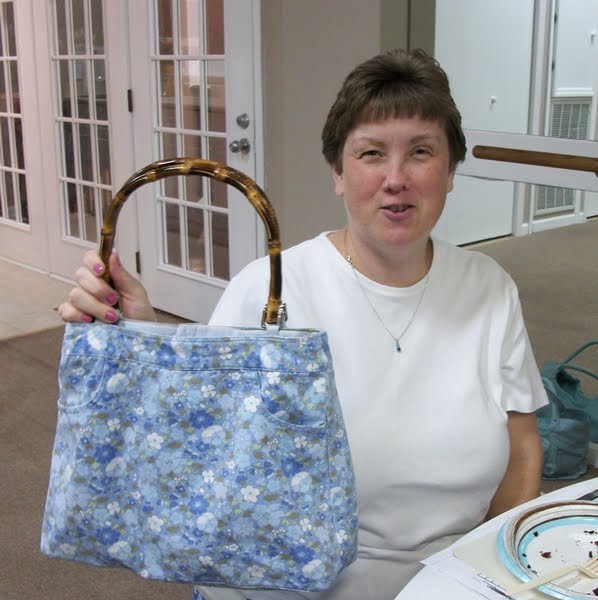
While there, I gave AB a belated birthday present: a purse I'd made from thrifted Girls' size 10 Old Navy culottes and a L.L.Bean Ladies' size L sleeveless blouse and some purse handles bought from Jo Ann's. It was an interesting exercise trying to figure out a pattern and how to use the blouse the best ways to get the lining and pockets done. In the end, there were just a handful of small pieces left. AB really enjoyed the bag but wanted to add another pocket. So I gave her what scraps where left and she took care of adding that pocket on her own.


This cute notebook was a Make-it-and-take-it project from a Moonlight stitching get-together at the LNS last year (or was it two?). I'd never gotten around to finishing it but did so recently. A simple, yet charming, design stitched on banding and then closed with herringbone stitch on the inside - which doubles for a needlepark. Something like that would make a great little gift for a crafty buddy, or just for anyone actually. Who doesn't need a notebook from time to time? The kloster block are just perfect for a bit of fancy Hardanger work. Hmm, I may just do that. If so, I'll post pictures


I've really been busy finishing things I'd started and never completed. Lately, it's been a lot of projects from my favorite designer, Susan Greening Davis. I just adore this project. Isn't that a wonderful sentiment? I don't know about you, but I feel most complete when I'm creating and I love creating with a needle.


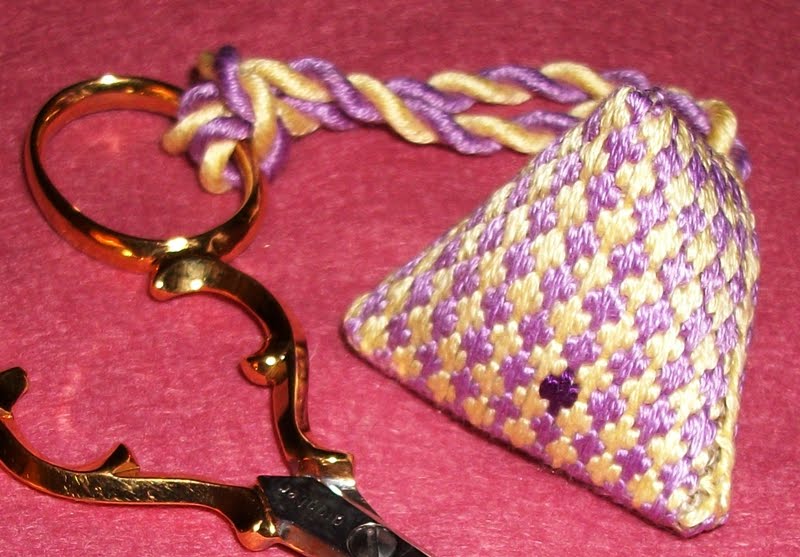
I finished the banding for the box that was created in the tutorial for the lined box with pincushion. The banding was from a Susan Greening Davis project that I tweaked a bit.


Saturday I'll be attending a class taught by Susan. I'm really looking forward to it as I learn wonderful techniques and stitches from her everytime I'm with her. If you ever get a chance to take one of her classes, go for it. She's such a wonderful, dear person and a great teacher.

This was the project for last year's class. Most of the actual needlework was done last year, but there were still a few small things to be stitched and the final finishing. I finished it this week -- just in time for the next class.


The needle book is my own design. The needle on the cover is secured by Jewel-It glue so it's not going anywhere.


Here's something you don't see every day:


This is the odometer from my 1995 Subaru Legacy Wagon on my way home from the office this past Thursday. With the exception of the 63 miles that were on there when Pookie and I bought it in September of 1994, and a couple of thousand miles Pookie's probably put on it over the years, I've driven most of that mileage. I'm on my way back from the Moon and still getting around 30 MPG. Not bad for a car that's almost 16 years old, no?

Friday, July 9, 2010

June's TUSAL and other random stuff


It's almost time to post the July TUSAL but I'm just getting round to posting the one for June. Such is life these days. I did take the picture around the correct time which should count for something. There are bits and pieces from all sort of stitching, both original projects and those I purchased, and scraps from finishing.


Lately, I've been stitching on Susan Greening Davis projects that I've gotten either at classes or at trunk shows. I really love her designs and I'm very grateful to her for all the wonderful stitching knowledge she's passed on.


Susan aways says to follow your heart and do what makes you happy..even if it is changing a design. This was one of the class pieces from the Souther Stitching class in St. Augustine last January. The original design had waves along the right and left edge, but I prefered to put fishes. The design came from the book A Rainbow of Stitches.


One stitch I came across while looking though stitching books (something I love to do) is the Hugarian stitch. I believe it is normally a needlepoint stitch but it works well with floss and linen, too. This little scissor fob was made with a scrap of linen and a lot of Hungarian stitches. A bit of cording and there it is.


I used a double running stitch and a surface stitch to create the little humbug. They are rather easy to make, actually, since it's just a matter of joining the top seam at a right angle to the bottom.


While I was in the mood to make scissor fobs, I braided this little guy using up some left over floss. As it turns out, I didn't have enough of the orange to make the cording and had to improvise with black. Meh, it is what it is.


A recent doodle using different stitches resulted in this little needle book. Notice the background is, again, the Hungarian stitch. I really like that stitch, it adds great texture.


Stitch Witchery was used to line the inside with fabric and a bit of wool felt created the needle park area.


Another recent stitching doodle became a little pin cushion...


...mounted on a small stuffed pillow.


The needle book and the pin cushion were given to stitching buddy LS as birthday gifts. She was delighted with them. Happy birthday, L!


The last bit of stitching was started on my way to Talladega back in April. It is a Ginnie Thompson Guild design that's Assissi work. I'm going to finish it into a pouch for my digital camera.


And, for the cat lovers out there, here are a couple of recent pictures of Bob.


He's actually bathing, but it looks like he's laughing into his paw.

Ok. That gets me up to day on posting. Y'all have fun.

Friday, December 25, 2009

Gifts for stitchy people and a tutorial

Hope everyone had a Merry Christmas - or at least a good day.

This year I made Christmas gifts for my stitching buddies: fabric covered tape measures with matching bottle cap pincushions (thank you to VeryBigJen for her Flickr tutorial on bottle cap pincushions) and personalized magnetic needle books for most everyone. (One gal mostly knits, the other already received a different personalized needle book on an earlier occasion.)

It was a lot of fun to select fabrics, color combinations and buttons that I thought the recipient would find pleasing. It was also fun engineering the magnetic needle books. There were a few false starts on those but I finally worked it out. Would you like to see the process? Here's a tutorial on making the needle books:

Fidget's Magnetic Needlebook

What you'll need:
fabric for exterior
fabric for interior
iron-on interfacing
flat flexible magnets
sharp scissors
tweezers
iron
a sewing machine or hand needle and thread
Aleene's Jewel-It glue or a multi-purpose glue that works with fabric


Getting ready:

Cut two pieces of fabric 2 5/8" by 3 1/2". One piece is for the exterior where the stitching will be done - if you want stitching. The second piece is the interior and will be mostly covered by the magnets. Use the same material for both or don't. Do what makes you happy!

Cut four pieces of iron-on interfacing about 1" by 1 1/4". This is roughly the size of each face of the needlebook less the top-stitched edge. Adjust the size so that there is about a 1/4" open border around the edges of the material and about a 1/4" in the middle for folding.


Cut two magnetic strips 1" wide by 1 3/4" long. I bought a roll of magnetic tape that was 1" wide, so that part was easy. Unless you're making many needlebooks or have a use for the excess magnetic tape, buying a roll may not make sense. You could use the flat magnets that you find with advertising and/or calendars on them but because these are thinner you'll need to either adjust the size of the magnet (make it a bit wider) or the size of the needle book faces (make them narrower.)

If you want to add stitching to your needlebook, now's the time to do it. I centered the stitching on the bottom half of the exterior fabric so that it would be on the front cover once assembled.

Putting it all together:

Flip the interior and exterior pieces over and position the interfacing in the four quadrants of the fabric. Be sure the interfacing is bumpy side down so that it fuses with the fabric, not your iron. Iron the interfacing according to the manufacturer's instructions.


Match the interior and exterior fabrics right sides together and pin in place. Sew completely around all four edges.


Trim the seams and angle the corners. Flip the piece over so you're looking at the interior side. Take your sharp scissors and cut a slit in the center of the interfacing on one side. Make the slit large enough to turn the piece but don't go all the way to the edges. Don't worry, we'll cover the hole later.


Use your tweezers to reach into the slit and grab a corner. Gently pull the fabric and turn it right side out. Use the tweezers to poke the corners out, but be careful not to poke through the seam.


Press the piece flat.


Top stitch about 1/8" from the edge of the needlebook on all four sides. I found it easiest to set the needle position to the left and stitch counter-clockwise (or to the right and stitch clockwise) instead of at center. This allows both feeddogs to move the fabric instead of just one if you tried to stitch that close to the edge from the center needle position. Trim any loose threads.


Put the magnet faces together. If you're using a tape or flat magnet that has sticky sides, put the sticky sides to the outside - but don't peel off the backing yet. If you're using an advertisement or calender magnet, put the printed side out. Test fit the magnets to the inside of the needlebook and make any necessary adjustments to the size of the magnets. Remember to try closing the needlebook. Once you're happy with how they will sit, peel off the backing on one of the magnets and put a drop of glue on the sticky side...


and use your finger to spread it around to all the edges.


Turn the magnet sandwich over and position the gluey side inside the needlebook. I usually do the side with the slit first.


Peel off the second backing paper and apply the glue in a similar manner.


Press closed and wait for it to dry.


Taa-daa! You're done!


Add needles and repeat as necessary.

Sunday, August 16, 2009

Weekend crafting

When I made the fob for my new scissors it took two tries to get the Hardanger how I wanted it. The first attempt was abandoned because, in the zeal to try out the new scissors, I cut all the threads inside the blocks. Rut-row. No wrapped bars for me. At least on that one. Made another, bars were wrapped, beads were added; you know the story. The other one seemed too cute to waste so I made it into a needlebook. Right now it just has one lowly little sewing needle (which is also useable as a beading needle), but now, I've got a set. Ain't that cute?

To celebrate our bazillionth anniversary, Pookie is taking me up to Alaska. I wanted to make a new something to take with me on the trip and for once didn't wait until the night before we were to leave. This time I made a travel wallet to hold all the confirmation papers, my passport and driver's license. I didn't have a pattern or much of a plan, just kinda cobbled it together as ideas came to me. It's not what I'd imagined when I started, but I'm happy with it. The original idea involved a lot more sewing, the finished product involves a lot of Stitch Witchery and glue.

The wallet includes a bit of recycling. The green snaps were from the 1970's stitching stash of a friend's late mother; RIP Mrs. E. And the form of the wallet was achieved by cutting and using bookboard from an old children's book. PP had thrifted many children's books and used the innards for paper crafting. She sent me a nice lot of book covers to use. The original purpose was for covered boxes, but the travel wallet was their first use. Boxes will come later, PP, I promise.