This song makes me happy. Hope it makes you happy, too! Enjoy!
Thursday, December 23, 2010
Sunday, December 12, 2010
Santa Paws
Yesterday was an interesting experience. Stitching buddy AC is active in a greyhound rescue group that has Meet & Greets periodically at area PetSmart locations. During the holidays, PetSmart has weekend "Photo with Santa Paws" events worked by different animal charities who receive part of the procedes from photo sales.
Thursday evening, AC was bemoaning the fact that try as she might, she wasn't getting any volunteers to play Santa on Saturday when the greyhound group was to benefit from the photo sales. Without thinking it through, I volunteered for the task - having had no, zero, zilch experience playing Santa Claus, of course.
From Thursday evening to Saturday morning I had plenty of time to think about what I had gotten myself into. Visions of dog bites, cat scratches and blood and urine soaked Santa suits haunted me. Plus, who had had on that Santa suit last? Ewwww....

AC at Santa Paws event
The photo shoot was to go from 11am to 4pm. I arrived at the PetSmart location at about 10:45. I was shown to the employee break room and the Santa suit. Thankfully, the Santa suit was fresh in a dry cleaner's bag. I took the costume - pants, jacket, belt, wig, beard, hat, spats, glasses and gloves - to the ladies' room to change, praying no little kids wandered in and caught a cross-dressing Santa getting dressed.
The costume was heavy, hot and ill fitting. The belt was way too big, even on the last notch; I could have used a pillow. The beard and wig were scratchy. This was going to be a long five hours.
When I walked out to the photo area, there was a line of folks ready and excited for their photos. Everyone was in a great and festive mood. This really did a lot to boost my spirts and lose my jitters. I tried a deep, "Ho! Ho! Ho!" but soon gave up because I sounded more like the Jolly Green Giant than Santa. Beside, the dogs didn't care and the owners didn't either since they just wanted cute photos of their pets and couldn't care less about whether Santa was a man or a woman.
The first dog up was Lucy, a short haired dog of undetermined breed that was absolutely determined that she was going to lick me to death. She pulled down the beard by stepping (nay, dancing) in it, tried to eat my nose, licked my glasses and face and had me laughing in that way that only happens when a joyous dog attempts to love you to death. She finally calmed down, while I readjusted the beard, and we got a cute picture after all.
That pretty much set the tone for the day. We had French bulldogs, English bulldogs, a trio of HUGE basset hounds, boxers, boxer/Pit bull mixes, Shih Tsus, Lhasa Apsos, Yorkies, a Dorkie (a designer-dog mix Yorkie + Dachshund), poodles, a Weimaraner named Grover that had just won the doggie lottery and been rescued (that day) by a large and loving family. There was only one dog, a Shelty named Unitus, that was a flop. He just wasn't in the mood to have his picture made. His owner said she had shopping to do and would try later; we never saw her again.
I got tickled at one of the owners. She was a real take-charge sort of gal and her dog was a Lhasa Apso (whose name I don't recall). She put the dog up on the platform next to me and began fussily arranging the dog's holiday collar, the position of her paws. As soon as she was satisfied with the dog, she began on me: fluffing the beard just so, arranging the pom-pom on the hat, tucking in whisps of hair, even arranging how my hands were positioned. I had to fight laughing at this. It really was a hoot and was all I needed to see to know this gal got what she wanted. All. The. Time.

Santa Paws!
At the end of the session, we'd raised over $125 dollars for the greyhound charity. This was impressive since the weather went to hell shortly after we got started and it was cold and windy with a hard rain for most of the day. I got to meet a lot of great dogs and some great owners, too. When I was returning the Santa suit to the employee break room, there were some cashiers who said all the photos that came through their lines were cute. That made me feel good and that the discomfort of the beard and wig (the worst part of the costume) was worth it.

Pookie braved the weather to come see me. Said he wouldn't miss it for the world. :)
Friday, November 26, 2010
T-Day +1
Hope everyone had a good holiday with family and/or friends. We had a nice quiet evening here at Casa d'Fidget and were thankful to be together with a warm meal, a roof over our heads and means to keep the wolves from the door. Life is pretty good.
Pookie and I just took a vacation in Florida. I haven't had a chance to go though all the photos yet so I'll save the narrative for later.
Enjoy your leftovers and good shopping bargains.
Pookie and I just took a vacation in Florida. I haven't had a chance to go though all the photos yet so I'll save the narrative for later.
Enjoy your leftovers and good shopping bargains.
Tuesday, October 19, 2010
Late Summer/Early Fall Craftiness
Ok, first things first. Here are the pictures of the TUSAL bottle for the last three months. August is on the left and October is on the right. I thought I'd taken a picture of September but I can't find it if I did. It looked a lot like August except there was a huge blob of blue floss added. More on that later.


The first crafty thing to share is one of the more recent, but it is also seasonal so I'd best get it in now.
A while back, I made a biscornu out of some great purple fabric that came in a kit. The fabric really was awesome and I couldn't bring myself to throw away the leftover scraps after assembling the biscornu. The scraps turned up just in time for a make-a-scissor-fob desire to hit me. (I can always use another scissor fob because I own too many scissors.)
Purple is my favorite Halloween color -- especially when paired with emerald green. Thinking cap engaged for a Halloween scissor fob, I quickly found a small bat motif, tweaked it just a bit and had a bat. Instead of stitching eyes, I applied two red glitter chips from some glitter glue in the stash.

I wanted to put some words on the back of the scissor fob, but couldn't come up with anything pithy off the top of my head, so I turned to the Internet and started looking for batty things there. A wonderful poem by Frank Jacobs called The Bat turned up:
The Bat
By Frank Jacobs
Bats are creepy; bats are scary;
Bats do not seem sanitary;
Bats in dismal caves keep cozy;
Bats remind us of Lugosi;
Bats have webby wings that fold up;
Bats from ceilings hang down rolled up;
Bats when flying undismayed are;
Bats are careful; bats use radar;
Bats at nighttime at their best are;
Bats by Batman unimpressed are!
I fell in love with the line "Bats remind us of Lugosi" and knew that was what the scissor fob needed. The lettering style came from taking batty = deranged.

The scissor fob was assembled using the tag string from a Vera Bradley bag (love that emerald green!) and a bead from my stash. I had some black matte scissors that were just begging for this scissor fob. But, they would need a scissor sheath, too.
Again turning to my stash for inspiration, I found some supple, old boot leather and some pleather that came from gawd-knows-where, and some scrap black velvet. Yes, there was a bat in my future. This seemed to be the perfect sheath for these scissors with that fob at this time of year.

This really wasn't hard to make. If anyone has a desire for a tutorial, or just some instructions for making one, let me know and I'll be happy to fill you in.
The big blue floss blob that was added to the September TUSAL bottle was the orts from the (finally) completed Smokey Mountain Cats that I've been working on for a long time. I believe I started it around 2000, but one of my friends thinks it was around 2002 or 2003. Either way, it's been in the WIP pile for a long time and it was time for the final push to get it done.

This project is 184 x 140 stitches - a small one for many of you - but for your humble author, the ADD Kid, this was a mammoth undertaking and I'm pretty damn proud of myself for getting it done. And the funny part of it all? It's going to be given away. It's always been destine for AH and I hope it is appreciated.
Fall is my favorite season. I love the mild temperatures, sleeping under quilts with the window open, the changing leaves and the winds. Going to the Farmers Market is also a treat. All the produce looks great and there are colorful pumpkins, gourds and mums all around.


This is my friend SU. She is very talented with tiny knitting needles and crochet hooks.

She had come across the first tiny needles she'd ever bought and was bringing them to our stitching group so we could admire the beautiful rose wood handles on them. When she arrived at the stitching group, she discovered one of the needles had been lost - probably when she dropped them into her project basket. I offered to make a lining for her basket so it wouldn't happen again.


The happy ending to the story is that SU found the missing needle not far from her stitching nest. It really had dropped through the open weave of the basket. But that will never happen again.
Lately, I've been playing with felting sweater in the washing machine. After a couple of near disasters and some reading on the Internet, I learned to put the sweaters in pillowcases prior to felting them in the machine.
I'm still in the thinking stage on what to do with most of the felted sweaters. I've made cat toys with the cuffs

and some house slippers for Mama

but I've got a lot more already felted and ready to go - as soon as the inspiration hits me.
Tuesday, October 12, 2010
Still alive and kicking
Contrary to popular belief, I have not been kidnapped by a band of skunks hell-bent on revenge and demanding the return of their kin. It's been a busy time at work and, after a day of sitting in front of a computer for work I had little desire to sit and type on one at home. I've been doing crafty things and have taken pictures along the way. Pictures and descriptions will be coming soon.
Saturday, August 14, 2010
Oh, fer Pete's sake!
Caught another skunk last night. I asked Sunny if this one was an adult. He allowed as how it was another teen-aged skunk. This would make a litter of seven - eight skunks in all. I had no idea we were being over-run with skunks.
The big questions is how many more are out there?
Sunny didn't leave a trap today. Mostly so that he wouldn't have to come out on Sunday to collect whatever wildlife would surely stumble into the trap. He suggested moving the cat bowls to a higher location since skunks don't climb.
Now I'll have to come up with some contraption for moving the cat food higher. Thinking cap engaged.
Hope everyone's having an awesome, skunk-free weekend.
Friday, August 13, 2010
Busy Week
It's been a hectic week. Mostly because of work, but other things have been going on too.
Had a great time at the class with Susan Greening Davis. Our project involved a Longaberger basket to use for a project basket and the accessories for it. It should be darling when it's done.
Sunday, another little skunk showed up and rattles the kitty food bowls. I called Sunny on Monday. He came out to place another trap and we caught the little stinker overnight. Tuesday, he came to get the skunk and replace the trap. We didn't catch anything on Tuesday night, but we caught a tabby cat Wednesday night.
This was a cat I hadn't seen around before so it was probably a neighbor's that got out and just had a misadventure. I've never seen anything move as fast as that tabby flying out of the trap when I opened the door. That kitty will probably never come anywhere close to my porch again.
Thursday night we caught a 'possum. I'd seen a mama possum and a couple of little ones around before so this wasn't a total surprise. Sunny came out today to take the possum to it's new home out in the wild and left us another trap. I'm really not sure how many more critters there are to catch.
The game seems to have changed so I'll change the scoring system to just a tabulation. Skunks: 7 (mama + 6 skunklets or kits if you wanna be technical about it). Opossums: 1. Cats: 1. Sunny's made seven trips to the wildlife refuge (one trip was a twofer) to relocate these critters to a place where they will be much happier.
Friday, August 6, 2010
Skunk Drama and Other Stuff
For the past couple of nights, I'd been taking in the cat food bowls in hopes of getting Mama Skunk to go for the grape jelly in the trap.
Yesterday, the guy that mows the lawn managed to get grass clippings in the cat food bowls on the porch. Without thinking, I tossed the cat food out onto the lawn. Then, I refilled the bowls for the feral kitties.
After dark, I happened to look out and saw Mama Skunk eating the cat food off the lawn. I called Sunny and asked if I should move the trap from the porch (close to where the food bowls usually are but aren't since I took them in) down to the lawn where Mama Skunk was eating the discarded food. He said that sounded like a good idea. Mama Skunk ran away when I went outside to move the trap. I added a bit more food on the ground below the trap and waited.
It wasn't long until Mama Skunk came back and happily munched all around the trap -- but didn't go in. *sigh* I added a bit more food around the opening of the trap, covered it with black plastic, went to bed and hoped for the best.

I got up at 5:45am to check the trap and, if necessary, move it up to the porch to get it out of the direct sun. To my delight, the trap had been sprung! Yeah! Got a skunk! I called Sunny to come get Mama Skunk and carried the trap, still covered with plastic, up to the porch.

Sunny came on over. Imagine my surprise when he said, "You know there's two skunks in there?" Yes, we had Mama Skunk and skunklet #5. Holy moly! I had no idea there were so many! He said that five was an average sized litter and that this may be all of them. He didn't leave a trap this time, but said that if more show up, just give him a call.

On the assumption that this is all the skunks, the final score is Sunny 6, Skunks 1. Go Team Sunny & Trapper Jack!
There've been a lot of skunk drama lately, but I've been crafty, too.
A couple of weeks ago some of my stitching buddies got together for some noms, stitching and playing Stitchopoly (basicly Monopoly for stitcher).

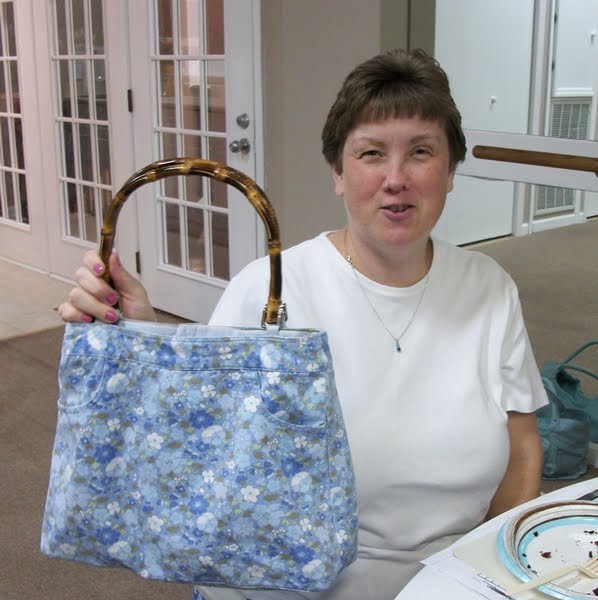
While there, I gave AB a belated birthday present: a purse I'd made from thrifted Girls' size 10 Old Navy culottes and a L.L.Bean Ladies' size L sleeveless blouse and some purse handles bought from Jo Ann's. It was an interesting exercise trying to figure out a pattern and how to use the blouse the best ways to get the lining and pockets done. In the end, there were just a handful of small pieces left. AB really enjoyed the bag but wanted to add another pocket. So I gave her what scraps where left and she took care of adding that pocket on her own.


This cute notebook was a Make-it-and-take-it project from a Moonlight stitching get-together at the LNS last year (or was it two?). I'd never gotten around to finishing it but did so recently. A simple, yet charming, design stitched on banding and then closed with herringbone stitch on the inside - which doubles for a needlepark. Something like that would make a great little gift for a crafty buddy, or just for anyone actually. Who doesn't need a notebook from time to time? The kloster block are just perfect for a bit of fancy Hardanger work. Hmm, I may just do that. If so, I'll post pictures


I've really been busy finishing things I'd started and never completed. Lately, it's been a lot of projects from my favorite designer, Susan Greening Davis. I just adore this project. Isn't that a wonderful sentiment? I don't know about you, but I feel most complete when I'm creating and I love creating with a needle.

I finished the banding for the box that was created in the tutorial for the lined box with pincushion. The banding was from a Susan Greening Davis project that I tweaked a bit.

Saturday I'll be attending a class taught by Susan. I'm really looking forward to it as I learn wonderful techniques and stitches from her everytime I'm with her. If you ever get a chance to take one of her classes, go for it. She's such a wonderful, dear person and a great teacher.
This was the project for last year's class. Most of the actual needlework was done last year, but there were still a few small things to be stitched and the final finishing. I finished it this week -- just in time for the next class.

The needle book is my own design. The needle on the cover is secured by Jewel-It glue so it's not going anywhere.

Here's something you don't see every day:

This is the odometer from my 1995 Subaru Legacy Wagon on my way home from the office this past Thursday. With the exception of the 63 miles that were on there when Pookie and I bought it in September of 1994, and a couple of thousand miles Pookie's probably put on it over the years, I've driven most of that mileage. I'm on my way back from the Moon and still getting around 30 MPG. Not bad for a car that's almost 16 years old, no?
Yesterday, the guy that mows the lawn managed to get grass clippings in the cat food bowls on the porch. Without thinking, I tossed the cat food out onto the lawn. Then, I refilled the bowls for the feral kitties.
After dark, I happened to look out and saw Mama Skunk eating the cat food off the lawn. I called Sunny and asked if I should move the trap from the porch (close to where the food bowls usually are but aren't since I took them in) down to the lawn where Mama Skunk was eating the discarded food. He said that sounded like a good idea. Mama Skunk ran away when I went outside to move the trap. I added a bit more food on the ground below the trap and waited.
It wasn't long until Mama Skunk came back and happily munched all around the trap -- but didn't go in. *sigh* I added a bit more food around the opening of the trap, covered it with black plastic, went to bed and hoped for the best.

I got up at 5:45am to check the trap and, if necessary, move it up to the porch to get it out of the direct sun. To my delight, the trap had been sprung! Yeah! Got a skunk! I called Sunny to come get Mama Skunk and carried the trap, still covered with plastic, up to the porch.

Sunny came on over. Imagine my surprise when he said, "You know there's two skunks in there?" Yes, we had Mama Skunk and skunklet #5. Holy moly! I had no idea there were so many! He said that five was an average sized litter and that this may be all of them. He didn't leave a trap this time, but said that if more show up, just give him a call.

On the assumption that this is all the skunks, the final score is Sunny 6, Skunks 1. Go Team Sunny & Trapper Jack!
There've been a lot of skunk drama lately, but I've been crafty, too.
A couple of weeks ago some of my stitching buddies got together for some noms, stitching and playing Stitchopoly (basicly Monopoly for stitcher).

While there, I gave AB a belated birthday present: a purse I'd made from thrifted Girls' size 10 Old Navy culottes and a L.L.Bean Ladies' size L sleeveless blouse and some purse handles bought from Jo Ann's. It was an interesting exercise trying to figure out a pattern and how to use the blouse the best ways to get the lining and pockets done. In the end, there were just a handful of small pieces left. AB really enjoyed the bag but wanted to add another pocket. So I gave her what scraps where left and she took care of adding that pocket on her own.


This cute notebook was a Make-it-and-take-it project from a Moonlight stitching get-together at the LNS last year (or was it two?). I'd never gotten around to finishing it but did so recently. A simple, yet charming, design stitched on banding and then closed with herringbone stitch on the inside - which doubles for a needlepark. Something like that would make a great little gift for a crafty buddy, or just for anyone actually. Who doesn't need a notebook from time to time? The kloster block are just perfect for a bit of fancy Hardanger work. Hmm, I may just do that. If so, I'll post pictures


I've really been busy finishing things I'd started and never completed. Lately, it's been a lot of projects from my favorite designer, Susan Greening Davis. I just adore this project. Isn't that a wonderful sentiment? I don't know about you, but I feel most complete when I'm creating and I love creating with a needle.

I finished the banding for the box that was created in the tutorial for the lined box with pincushion. The banding was from a Susan Greening Davis project that I tweaked a bit.

Saturday I'll be attending a class taught by Susan. I'm really looking forward to it as I learn wonderful techniques and stitches from her everytime I'm with her. If you ever get a chance to take one of her classes, go for it. She's such a wonderful, dear person and a great teacher.
This was the project for last year's class. Most of the actual needlework was done last year, but there were still a few small things to be stitched and the final finishing. I finished it this week -- just in time for the next class.

The needle book is my own design. The needle on the cover is secured by Jewel-It glue so it's not going anywhere.

Here's something you don't see every day:

This is the odometer from my 1995 Subaru Legacy Wagon on my way home from the office this past Thursday. With the exception of the 63 miles that were on there when Pookie and I bought it in September of 1994, and a couple of thousand miles Pookie's probably put on it over the years, I've driven most of that mileage. I'm on my way back from the Moon and still getting around 30 MPG. Not bad for a car that's almost 16 years old, no?
Tuesday, August 3, 2010
Updated Score
The new score is Sunny 4, Skunks 1.
Last evening, upon hearing the outside food bowls rattling, I peeked out the window in the front door and saw Mama Skunk finishing off the last of the cat food. After getting a drink of water, she waddled past the trap -- not even giving it a glance -- and down the steps she went and off into the night. Score 1 for the Skunks.
I put out a bit more food and immediately Ginger came up on the porch to eat, so that was a good thing. A while later, though, I heard a cat commotion and found Tabby-with-the-white-feet (a cat that lives down the street but likes to eat our food) giving Ginger a hard time about the food, so I brought the bowl in.
This morning Patches and Ginger were both looking in the trap with guarded interest. Sho'nuff, there was yet another teenaged skunk in the trap. I had no idea there were this many! Sunny's escorting this little stinker to the wildlife refuge to join his/her brothers/sisters and start a family reunion in the woods.
Tonight, I'll try to bring the food in before Mama Skunk comes by and see if the grape jelly won't tempt her into the trap.
Monday, August 2, 2010
Stinker Update
Well, the Cute Litte Stinker Roundup has begun. So far the score is Sunny 3, Skunks 0.
I contacted Trapper Jack wildlife removal service on Friday. Sunny Rippetoe came out and set up two humane live traps. Friday night/Saturday morning we caught one teenage skunk. Sunny came out, retreived the first skunk and reset another trap. Saturday night/Sunday morning we caught two teenage skunks. Sunny came out again to get the skunks and reset the trap hoping to catch Mama Skunk. Didn't catch Mama last night, didn't catch any thing, but I expected Mama Skunk to be a bit more wiley. We'll see how long she can resist the grape jelly that's being used as bait.
Sunny is taking the skunks far, far away fromtheir my home and relocating them in an approved wildlife area close to a river. They should be much happier there than in my neighborhood where they can be run over by a car.
I contacted Trapper Jack wildlife removal service on Friday. Sunny Rippetoe came out and set up two humane live traps. Friday night/Saturday morning we caught one teenage skunk. Sunny came out, retreived the first skunk and reset another trap. Saturday night/Sunday morning we caught two teenage skunks. Sunny came out again to get the skunks and reset the trap hoping to catch Mama Skunk. Didn't catch Mama last night, didn't catch any thing, but I expected Mama Skunk to be a bit more wiley. We'll see how long she can resist the grape jelly that's being used as bait.
Sunny is taking the skunks far, far away from
Saturday, July 17, 2010
Cute Little Stinker
There are several feral kitties that depend on me for food and water. Two main ones and some that come by occassionally. Therefore, there is usually kitten chow and water on my front porch. One of the drawbacks to this is that I end up feeding animals I did not intend to feed. Like possums. And skunks. Currently, a family of skunks.

A couple of weeks ago, there was a commontion (with lots of squeaking) on the front porch. I went to the door to see what was going on. There was mama skunk and two young skunks. The youngsters seemed to be bickering over the kitten chow.
If you turn on the porch light and open the door, the skunks (and possums) usually leave quickly with no problem. This night, however, mama and skunklet #1 left right away. Number 2 had a different idea and came over to me. Stopping about 18 inches away, just staring up at me. The cheeky little thing finallly left after a few Shoo!s and a couple of you-need-to-leave-nows.
I think tonight's visitor to the cat bowls was that little stinker. S/he showed very little fear when I came out on the porch and snapped a picture or two. It may become necessary to hire someone to relocate this brazen little fella since s/he is learning not to be afraid of humans.
And because s/he can wipe out two bowls of kitten chow in one sitting!
Friday, July 16, 2010
July's TUSAL and other things

I'm less than a week late for posting the July TUSAL. Not bad for me. There's some new stuff in the bottle from recent projects, some more ort producing than others. Sure glad I'm using a bigger bottle. All of this wouldn't have fit so well into the small bottle I used last year.

For last year's July TUSAL, I took a picture of my orts bottle with a pair of scissors wearing this beautiful fob my friend SU had made for me. The frock is so complete there's even a petticoat under it!
 At a recent stitching gathering I chanced to be sitting next to SU and I had the fob with me. S was very good natured about me wanting to get a picture of her with her creation. Thank you again, S! Love you, mean it!
I've been working on a lot a Susan Greening Davis projects lately. This one I really like and enjoyed making it. So many pretty stitches and beautiful beads!

This Purple Tuffet by Susan is my latest project. It took less than a day to complete. I so adore fast projects and the gratification that goes with them.


And speaking of biscornus, this one was a recent Make-It-And-Take-It project at the LNS. FC, one of the stitchers that attended, said she never does the projects and passed it on to me. It was a fun little project to stitch and originally was charted for only the little ABC pattern. The back is a freebie pattern I had printed from online some time in the past...from I don't remember where. If it's your's please leave me a message and I'll give you credit and link back to it. The pattern, with the addition of a few beads, was perfect for the tuffet. As a surprise, I gave the finished project back to FC. She was delighted and immediately started using it as a pin cushion. I love making useful things.

Lately, Pookie and I have been going to the local Farmers' Market to get yummy fresh vegetables. I don't have my late daddy's green thumb so I have to satisfy my yearning for home grown tomatoes at the Farmer's Market. It's a great little outing for a summer day and well worth the drive.

That squash was as delicious as it looks.

And, speaking of nature, here's a lovely web that I found the other morning as I was leaving for the office.
That's all for now. Happy stitching, y'all.
Friday, July 9, 2010
Tutorial: Lined box with compartment
Please add a comment and let me know how you came to be at this tutorial and if it was helpful for you. Thanks!
I've recently been working on a kit from a favorite designer. I really liked the banding for the project, but the final finishing didn't make my heart sing. So, I poked around in the craft room and found what (with a bit of craftiness) will be a great alternative for finishing.

This little wooden crate is 3"h x 4.25"w X 3.5"d. Just a plain-jane little wooden crate. The banding was a near perfect fit, so it was time for some crafty goodness to dress it up a bit.
What you need:
wooden box
book board
rotary cutter/cutting mat/cutting guide or scissors
spray adhesive
quick dry tacky glue
felt
Sharpie or paint to match/contrast with felt
small scrap of fabric for pin cushion
sand or weights for pin cushion (optional)
poly fiber-fill

First, measure the inside dimensions of the crate. I measured in millimeters since it would be more precise. Measure the height, width and depth of the interior of the box. You will need one (1) piece for the bottom (width x depth), two (2) pieces for the sides (width X height) and three (3) pieces for the ends and center divider (depth x height).

Transfer your measurements to a piece of book board or heavy cardboard.

I used a rotary cutter and cutting mat and cutting guide to cut the pieces. It takes several passes with the rotary cutter to cut through the book board, but it make a very nice clean cut and it's worth the effort.

Test fit the pieces in your box. Put the bottom piece in first and then the two long sides. Make sure they are level with the top of the wooden box.

You will need to adjust the width of the three end pieces because of the width of the book board itself. Place the pieces on top of the box with the bottom and side pieces in place. Mark where the edges need to be trimmed and do so.

Test fit all the pieces now. The two end pieces and the middle piece should all fit within the two side pieces. If they are a little loose, that's good since the felt will make the side pieces a little thicker.

Take your Sharpie or paint and color the exposed edges of your pieces. This is just a matter of aesthetics and purely your choice. Do whatever makes your heart happy.

Now it's time to use the spray adhesive. I love this stuff but it can be evil if it ends up somewhere it shouldn't be. I like to put the pieces to be sprayed into a box to keep the spray from going everywhere. You can do this or take it outside (on a day with no or very little wind) or cover an area with paper or a drop cloth. Spray the adhesive on one side of the following five pieces: the bottom, the two side pieces and one of the end pieces and one side of the center piece.

Position the piece sticky side down on the felt. Press it in place so you get a good bond.

Neatly cut out each piece using the book board as the cutting guide.

If you used a little crate, you may want to make filler slats to give the box more solid sides.

Use the quick tack glue between the wooden slats and position the filler slats on top of the glue. Be sure the edges are flush with the box.

Put a bead of quick tack glue along the side and bottom edges of the book board center piece. Where you position it will determine the size of the compartment and the pin cushion.

Be very sure that the felt side faces the compartment side and the blank side faces the pin cushion side. The glue may get a bit messy when you position the piece. It will dry clear but you may dab at it with a damp cloth to clean it up a bit, if necessary.

If you want to give your box a bit of weight and make it more stable now is the time to put something in the bottom of the pin cushion compartment. I used about 1/3 cup of fine sand wrapped up in aluminium foil to add weight to my box.

I folded the foil into a packet and scrunched the ends up until it fits the compartment.

Push the packet around until it fills the bottom of the compartment. This isn't rocket science and doesn't need to be perfect; close is good enough.

Cut a piece of fabric for the top of the pin cushion. Make it at least twice as big as the pin cushion compartment. You'll need about half an inch on each side for gluing down and a bit in the middle to allow for poofiness. Put a line of glue on the inside far edge of the pin cushion compartment.

Press the right side of the long edge of the fabric onto the glue.

Put a line of glue on the near edge (the uncovered side of the center divider).

Use your fingers (or a pencil or other tool) to press the right side of the fabric into the glue. Using your fingers will help you leave a bit of room for the pin cushion to poof out.

Put glue on one of the short ends.

Poke your finger in the pin cushion tube (or a pencil or other tool) to press the right side of the fabric into the glue. Make any necessary adjustments to make it look nice.

Stuff small tufts of poly fiberfill into the open end of the pin cushion. Small tufts will keep the cushion from becoming lumpy. Be sure to poke it down into the corners. Fill it nice and full.

Filled and ready to close.

Use your fingers to push the fabric and stuffing away from the unglued edge and apply a line of glue.

Push the fabric into the glue, easing the fabric into place to make it look nice.

You're done! Now you've got a great little piece to keep your pins and needles under control while also having a place for your tools and what-nots.

Cover the box in whatever manner makes you happy. When I've finished stitching the banding, it's going around this box and I know I'll be delighted.
Have fun with this. I'd love to hear (and see results) from anyone that gives this tutorial a try.
I've recently been working on a kit from a favorite designer. I really liked the banding for the project, but the final finishing didn't make my heart sing. So, I poked around in the craft room and found what (with a bit of craftiness) will be a great alternative for finishing.

This little wooden crate is 3"h x 4.25"w X 3.5"d. Just a plain-jane little wooden crate. The banding was a near perfect fit, so it was time for some crafty goodness to dress it up a bit.
What you need:
wooden box
book board
rotary cutter/cutting mat/cutting guide or scissors
spray adhesive
quick dry tacky glue
felt
Sharpie or paint to match/contrast with felt
small scrap of fabric for pin cushion
sand or weights for pin cushion (optional)
poly fiber-fill
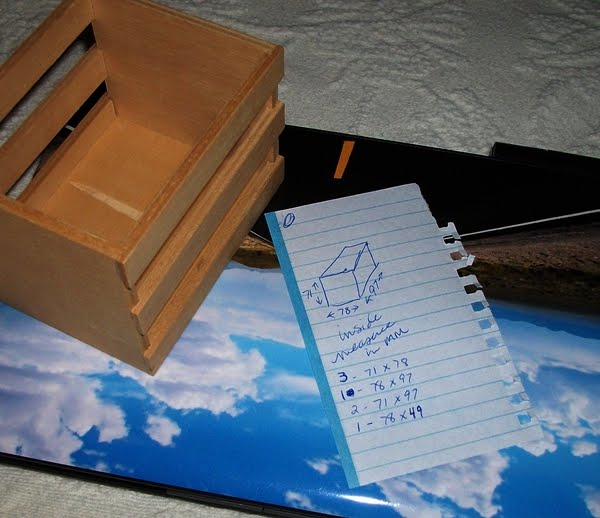
First, measure the inside dimensions of the crate. I measured in millimeters since it would be more precise. Measure the height, width and depth of the interior of the box. You will need one (1) piece for the bottom (width x depth), two (2) pieces for the sides (width X height) and three (3) pieces for the ends and center divider (depth x height).

Transfer your measurements to a piece of book board or heavy cardboard.

I used a rotary cutter and cutting mat and cutting guide to cut the pieces. It takes several passes with the rotary cutter to cut through the book board, but it make a very nice clean cut and it's worth the effort.

Test fit the pieces in your box. Put the bottom piece in first and then the two long sides. Make sure they are level with the top of the wooden box.

You will need to adjust the width of the three end pieces because of the width of the book board itself. Place the pieces on top of the box with the bottom and side pieces in place. Mark where the edges need to be trimmed and do so.

Test fit all the pieces now. The two end pieces and the middle piece should all fit within the two side pieces. If they are a little loose, that's good since the felt will make the side pieces a little thicker.

Take your Sharpie or paint and color the exposed edges of your pieces. This is just a matter of aesthetics and purely your choice. Do whatever makes your heart happy.

Now it's time to use the spray adhesive. I love this stuff but it can be evil if it ends up somewhere it shouldn't be. I like to put the pieces to be sprayed into a box to keep the spray from going everywhere. You can do this or take it outside (on a day with no or very little wind) or cover an area with paper or a drop cloth. Spray the adhesive on one side of the following five pieces: the bottom, the two side pieces and one of the end pieces and one side of the center piece.

Position the piece sticky side down on the felt. Press it in place so you get a good bond.

Neatly cut out each piece using the book board as the cutting guide.

If you used a little crate, you may want to make filler slats to give the box more solid sides.

Use the quick tack glue between the wooden slats and position the filler slats on top of the glue. Be sure the edges are flush with the box.

Put a bead of quick tack glue along the side and bottom edges of the book board center piece. Where you position it will determine the size of the compartment and the pin cushion.

Be very sure that the felt side faces the compartment side and the blank side faces the pin cushion side. The glue may get a bit messy when you position the piece. It will dry clear but you may dab at it with a damp cloth to clean it up a bit, if necessary.

If you want to give your box a bit of weight and make it more stable now is the time to put something in the bottom of the pin cushion compartment. I used about 1/3 cup of fine sand wrapped up in aluminium foil to add weight to my box.

I folded the foil into a packet and scrunched the ends up until it fits the compartment.

Push the packet around until it fills the bottom of the compartment. This isn't rocket science and doesn't need to be perfect; close is good enough.

Cut a piece of fabric for the top of the pin cushion. Make it at least twice as big as the pin cushion compartment. You'll need about half an inch on each side for gluing down and a bit in the middle to allow for poofiness. Put a line of glue on the inside far edge of the pin cushion compartment.

Press the right side of the long edge of the fabric onto the glue.

Put a line of glue on the near edge (the uncovered side of the center divider).

Use your fingers (or a pencil or other tool) to press the right side of the fabric into the glue. Using your fingers will help you leave a bit of room for the pin cushion to poof out.

Put glue on one of the short ends.

Poke your finger in the pin cushion tube (or a pencil or other tool) to press the right side of the fabric into the glue. Make any necessary adjustments to make it look nice.
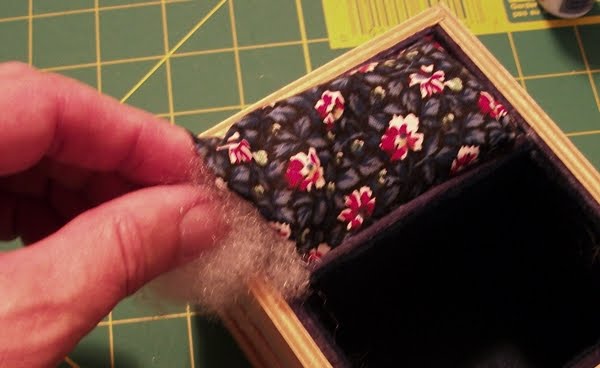
Stuff small tufts of poly fiberfill into the open end of the pin cushion. Small tufts will keep the cushion from becoming lumpy. Be sure to poke it down into the corners. Fill it nice and full.

Filled and ready to close.

Use your fingers to push the fabric and stuffing away from the unglued edge and apply a line of glue.

Push the fabric into the glue, easing the fabric into place to make it look nice.

You're done! Now you've got a great little piece to keep your pins and needles under control while also having a place for your tools and what-nots.

Cover the box in whatever manner makes you happy. When I've finished stitching the banding, it's going around this box and I know I'll be delighted.
Have fun with this. I'd love to hear (and see results) from anyone that gives this tutorial a try.
Subscribe to:
Comments (Atom)